Showing posts with label acrylic paint. Show all posts

Friday, 28 December 2012

Snowy days

Hello friends, I hope you all had a wonderful Christmas, and are enjoying your holidays! So we didn't exactly have a white Christmas, but it sure made up for it today. So much snow! It's only the beginning, and I already had a bit of trouble yesterday morning. My mom was driving me to the train station, and she swerved into a snow bank to avoid hitting a car in front of us. We were stuck. Luckily, no one was hurt, and thanks to the kindness of several passerby's that helped us clear the snow and push us out, I was able to make it to work only half an hour late.

While snow definitely adds some difficulty for us commuters, it can still be very pretty! I wanted to do a snowy manicure, and I knew exactly which glitter I wanted to do it with.
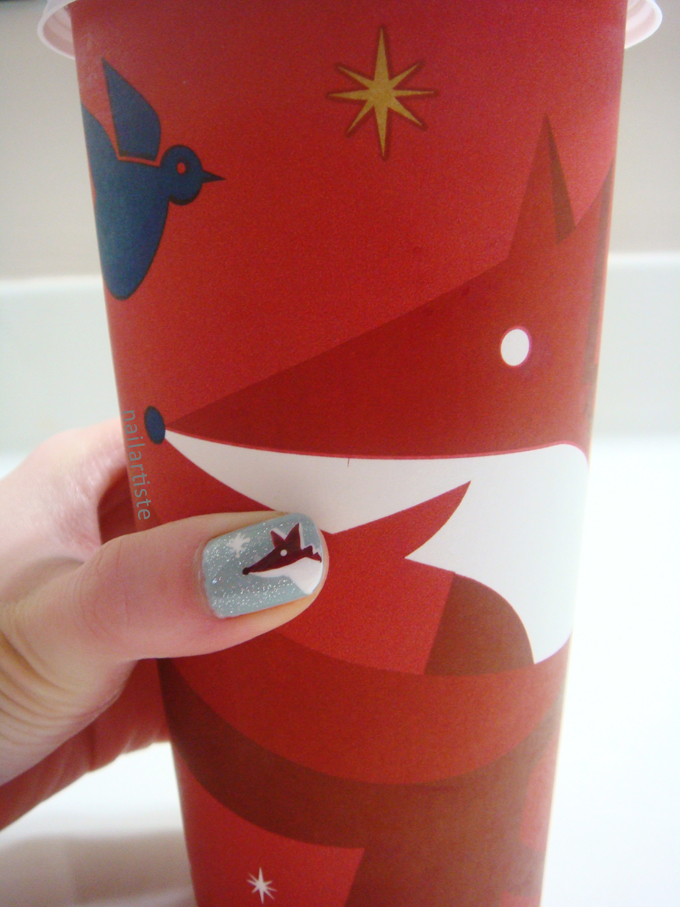
The base colour is Essie "Who Is The Boss", and the glitter is OPI "Pirouette My Whistle". It is so delicate and pretty, and simply perfect for a soft, snowflake effect. I painted the rabbit and the fox with acrylic paint.
Sorry about the dry hands. It was freaking freezing when I was taking these pictures - I ran in afterwards to slather cuticle cream and lotion on.
If these guys look familiar to you, it's probably because you've seen them on that cup holding your caramel brûlée latte (mmm yum). I always look forward to Starbucks' holiday drinks and cups, and I love the designs this year. The rabbit and fox are so cute!
Big fox, little fox
On my right hand, I did an accent nail with the Ciaté caviar kit my cousin gave me for my birthday. The silver is "Fit for a Queen", and the pearls are in the colour "Hologram". I didn't sprinkle the pearls on my nail fully, and I love the look so much.
I wore this over Christmas, but after one day, I was ready to take it off, because I couldn't stand having any more pearls falling off. Since I was going to remove it, I thought, why not experiment first and try putting some glitter and topcoat over it? Normally, you're not supposed to apply topcoat, as it'll cause the pearls to lose their colour. So I dabbed some China Glaze "Snow Globe" over top and THIS HAPPENED.
I LOVE this. The glitter over the silver and the pearls is insanely pretty. It looks like ice crystals, and as an added bonus, the pearls are now rock solid. I can go about using my hands without worrying about them falling off. I don't think I'll always get such a nice effect with other colours of pearls, though I'm willing to experiment.

So this turned out to be a really long post, and I need to go to bed. I'll definitely do a full Ciaté caviar post in the future. Hope you enjoyed these!

Thursday, 29 November 2012

First winter mani!

Nothing says "winter is here", better than snow. I love walking in gently falling snow, I love the clear days right after a huge snowfall, and I love watching it snow while sitting inside, drinking hot chocolate...but if only snow could come without the cold!

I felt like doing something seasonal, so I painted this birch tree, bird, snowy pattern that I found on Shutterstock. It reminds me of something you might find on one of those blank Christmas cards that come in sets of fifty.
  Polishes:
Left to right: China Glaze "For Audrey", "Snow Globe", Sally Hansen "Kook-A-Mango", Kleancolor "Mango"
I painted two base coats of For Audrey, and one coat of Snow Globe. You can't tell in these pictures because of the lighting, but the glitter in Snow Globe gives the effect of pretty, twinkly snow. I used white acrylic paint to paint the tree trunks, and went back with For Audrey to paint the tree markings. Then I painted the branches. Last, I  mixed some Kook-A-Mango with Mango for the birdies.
I'd also like to let you dear readers know that I will be holding a GIVEAWAY very soon! Partly to celebrate *almost* reaching 100 subscribers, but mostly just to spread some Christmas and holiday cheer :) Please look forward to that!

Monday, 26 November 2012

And I will eat them in a house. And I will eat them with a mouse.

And I will eat them here and there.
Say! I will eat them ANYWHERE!
I do so like
green eggs and ham!
Thank you!
Thank you,
Sam-I-am!
-Green Eggs and Ham by Dr. Seuss

Today I have another Dr. Seuss manicure! After my Cat in the Hat nails, I was excited to take on another one of my favourite Dr. Seuss stories.  

Polishes:
Left to right: Sally Hansen "Grass Slipper", "Blue Away", China Glaze "Lemon Fizz", American Apparel "Poppy"


In addition to these, I also used white and black acrylic paint. I love how Dr. Seuss books are illustrated in mostly primary colours. Simple is good! I painted two coats of my base colours first, used a thin brush to draw the outlines in black, and then filled them in with colour afterwards.  
Do I get the red glove thumbs up of approval? I am super happy with these, so I hope you like them! Let me know if you'd like to see any other Dr. Seuss mani's!

Thursday, 22 November 2012

The bunny jumped over the moon

I was reminded of the folklore story of the rabbit that lives on the moon, after seeing Shannon's adorable bunnies at night at Somewhere over the polish rainbow. This "moon rabbit" is akin to the idea of the man in the moon. It's really interesting to see variations of the story across cultures!

I recently scored a bottle of Zoya "Storm", and it is absolutely perfect for a night sky with millions of tiny holographic stars. Ugh, it's just so beautiful. I painted little stars and bunnies in white acrylic paint over three coats of Storm.
 
I just need to take the time to praise the wonderful, forgiving qualities of water-based, white acrylic paint. I first discovered while painting my Japanese wave nails that if I made a mistake, all I needed to do was rub it out with a Q-tip dipped in water. This saved me in more ways than one, let me tell you.
I hope you love these little bunnies as much as I do! Happy Thanksgiving to my American friends, may you stuff yourselves silly with turkey this weekend.

Friday, 16 November 2012

Japanese wave pattern

I've always liked this traditional Japanese pattern for ocean waves. It's simple, but quite intricate looking at the same time. I thought, how cool would that look on my nails?! I think this is the first time I freehanded a full pattern like this. I LIKE IT.
  
Polishes:
Left to right: China Glaze "Dorothy Who?", OPI "No Room for the Blues", American Apparel "American Denim"
First I painted two coats of Dorothy Who, and then sponged on a gradient with No Room for the Blues and American Denim. Then I painted on the pattern with a nail art brush and white acrylic paint, starting at the tip of my nail and then working the waves up to the cuticle.
 I really love the effect with the gradient. And they didn't even take as long as I was expecting! The lines are nowhere near perfect, but I think that lends a certain charm to the pattern :) That's all, have an awesome weekend!

Thursday, 6 September 2012

Nail Art: Calvin and Hobbes

Hello friends, long time no see. I've been pretty busy for the past week, hence the lack of posting, but I happily had time to sit down yesterday and paint something.

I've been wanting to do Calvin and Hobbes themed nails for a while now. I bought several Calvin and Hobbes comic books at an amazingly inexpensive bookstore in Toronto, and they quickly became my favourite thing to read for a quick pick-me-up. Makes me think how much less boring it would be being an adult if I just had a stuffed tiger.

The hard part was making a design that would show their friendship; something the comics express so plainly. I settled on this simple design with a simple message in mind: where some may see a stuffed tiger, Calvin sees his best friend.


Polishes:
Left to right: Illamasqua "Nomad", Zoya "Arizona", Sally Hansen "White On" and "Black Out", Folk Art acrylic paint #949 "Skintone" and #509 "Sunny Yellow"
Directions:
Finished!


I love how these turned out and I get happy when I look down at my fingers. These are probably not the last Calvin and Hobbes themed nails from me. Hoped you enjoyed this! 

Saturday, 4 August 2012

Nail Art: Tangled - Floating Lights

Happy weekend, everyone! Today, I want to share a special nail art design with you that I'm very proud of.

I am one of the millions of people that watched Tangled and was completely captured by it. The characters are endearing, the animation is gorgeous, and the story gives a fresh twist on the classic Rapunzel story. What more could I ask for? Now, when asked what the most beautiful and iconic scene of that movie is, most people can probably agree: when the lanterns are released from the castle.

Here is my tribute to that most unforgettable scene.


My inspiration


Polishes:
Sky
Left to right: OPI "Sparrow Me The Drama", American Apparel "Dynasty", American Apparel "Mount Royal", Sally Hansen "Navy Baby"

 Castle & Boat
Black and white acrylic paint - add a bit of white to the black so it isn't as harsh
Note: acrylic paint is a matter of personal preference. It doesn't dry as fast, so I find it easier to work with at times, but black and white nail polish would work as well

 Lanterns
Left to right: China Glaze "Lemon Fizz", American Apparel "Rose Bowl", Nubar "Nubar 2010"
Magic happens here! Use any red orange flakie ( eg. Essie "Shine of the Times", Sally Hansen "Hidden Treasure") to give the lanterns a glow.

Directions:
You can find my gradient tutorial here

Dab the flakies where your lanterns are to give them a glow. Top coat over everything, and finished!

Tips:
  • Don't stress about the castle! You just need the general form and it will look like a castle! It'll be covered by some lanterns anyways, so it doesn't need to be anywhere near perfect.
  • Feel free to use the same brush while painting the lanterns. I dotted on the yellow first, and then went right into the pink and white.
  • If you don't paint the castle, just do the lanterns! I did only lanterns for my right hand, and it looks gorgeous!
I really hope you enjoyed this design and tutorial! Please let me know what you think, and if you have any questions, leave me a comment! Have a good one!

Saturday, 21 July 2012

Nail Art: The Dark Knight Rises

The Dark Knight Rises was one of the summer blockbusters that I was most looking forward to (right up there with The Avengers), so of course I had to do a little nail art to celebrate its release!

The Bat Signal, Batman, and Catwoman with black and yellow Chevron tips

After working on my left hand, my right hand usually gets neglected

Polishes:
Left to right: Sally Hansen "Celeb City", Sally Hansen "Mellow Yellow", Sally Hansen "White On", Sally Hansen "Black Out", Nubar "Swiss Chocolate", Folk Art acrylic paint in #949 "Skintone"

Materials:
  • bobby pin
  • nail art brush
Directions:

Base: Paint your thumb black, and the rest silver


Batman and Catwoman: both painted using a nail art brush, with a bobby pin to dot on the eyes. I used acrylic paint for the skin mainly because it's easier than having to mix my own skintone every time. Yay for the easy way.

Chevron Tip: I used two thick-ish coats for the yellow to show. When making the Chevron pattern, it's easiest to make long, diagonal strokes from side to tip.

Bat Signal: Use a white base to help the yellow show up easier against the black base. The best way to paint the bat is to break it down into chunks. If you make any mistakes, you can go back and use yellow polish to fix or refine it.

I can't wait to watch the movie!! Anybody else excited for it? Seen it already?