Showing posts with label pink. Show all posts

Sunday, 2 June 2013

Holographic bubblegum

Like holographic strawberries, holographic bubblegum also possesses magical properties. If you manage to get your hands on a piece of this magical treat, you will find that as you chew, the gum not only stays soft and pliable for hours on end, but when you blow a bubble, you will be able to hover up to four feet above the ground!
Just a little silliness from me today, and a gradient with Color Club Miss Bliss and Over the Moon. I still can't believe how long it took me to get into holo polishes. Now I feel like I need them ALL. Here is Miss Bliss by herself, in all her rainbow sparkly goodness.
Sooo shinyy *o* What are your favourite holo's?

Saturday, 9 March 2013

Some essence untrieds

Hey guys! I finally got around to using some essence colours that have been sitting on the top of my nail polish drawer all lonesome and untried. You know the ones - whether in drawer, bin, basket, or what have you, we all got our untrieds. Finally decided to give them some attention, and here's how I used them.
First up is "Grey-t To Be Here". You see that flash of pink shimmer peeking out there? That's what compelled me to pick this one up. While the shimmer is not very apparent, it IS very pretty when it comes out in the light. If not for the shimmer, this is a nice, light grey that went on well in two coats.
Added chevron accents with a striper brush. The neon pink is China Glaze "Love's a Beach" (HA, still love the name), and the glitter is China Glaze "Tinsel Town".
My second essence polish is "Modern Romance". A peachy pink with the same hidden pink shimmer in "Grey-t To Be Here". This one took three coats to get to opacity - I wasn't a huge fan of it on its own, so I used it as a base for a gradient with Sally Hansen "Snappy Sorbet", and Essie "Coral Reef".
The idea of "peach soda" was in my head at the time, so I added a layer of OPI "Pirouette My Whistle" on top of the gradient for some bubbly. Swiped on a couple leaves with American Apparel "Office" for a final touch. Ahhh refreshing.
Have you tried any essence polishes yet? Are you a sucker like I am for shimmer in a bottle? Until next time!

Tuesday, 25 September 2012

Alice in Wonderland Nail Art Series: Cheshire Cat

 "You may notice I'm not all there myself."


Hi friends! I'm happy today to make the first post in my "Alice in Wonderland" nail art series. I'll be doing a set of Wonderland themed nails every week, for the next several weeks. Hope you'll enjoy these! I've always loved the imagery from "Alice in Wonderland". It's crazy and can be a bit unsettling, but so colourful and fun.

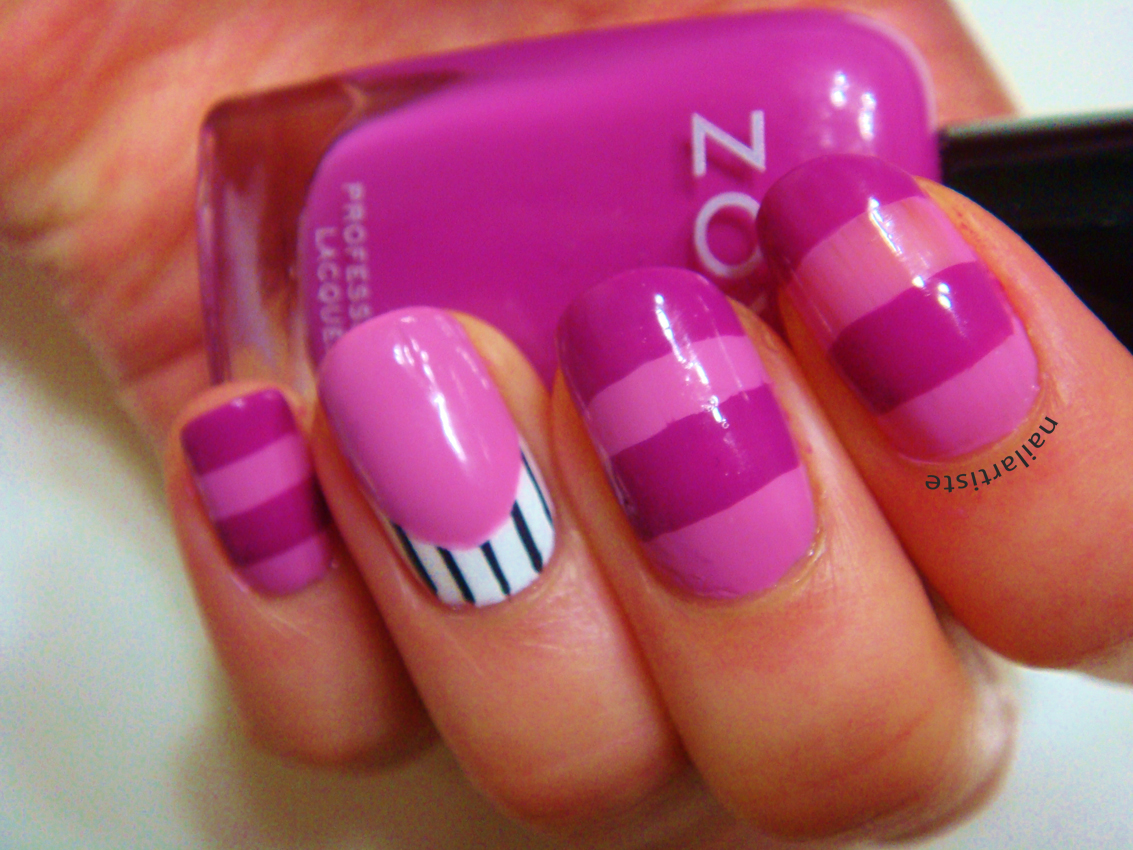
These first set of nails are inspired by the Cheshire Cat, with his trademark grin, and disappearing stripes. If you look closely, you can see the pink stripes start solid on the middle finger, get slightly more transparent on the index, and then disappear completely on the thumb.


Polishes:
Left to right: OPI "Sparrow Me the Drama", Zoya "Reagan", Sally Hansen "White On", black striper
Directions:
Here is how I created the Cheshire smile. The Zoya brush was very easy to maneuver, so the thick purple stripes are painted freehand.


1) Paint two coats of white and make evenly spaced stripes with a striper.
2) Cut a smile shape from tape. I just modified a binder paper reinforcement.
3) Line up the smile with your cuticle, and make sure it's pressed down completely. 
4) Paint a coat of white on the remaining area to cover up the extra stripes. Then a coat or two of pink.
5) Remove the tape the reveal your wide Cheshire smile.


Finished! If you have any suggestions for me or specific designs you'd like to see, just leave me a comment!

Alice in Wonderland Nail Art Series

    Thursday, 23 August 2012

    Nude Gradient with OPI My Very First Knockwurst

    I saw this look on Zoenails and I fell in love! Simple, with a pop of colour - and you might know how I love my gradients! I had a major nail polish haul this week, and OPI My Very First Knockwurst was one of them, so here's my version.

    This was done with two coats of OPI My Very First Knockwurst, and then sponged with Sally Hansen Snappy Sorbet.

     
    My Very First Knockwurst is a light pink putty creme from the OPI Germany Collection. It comes off as a dusty rose, leaning to lilac. The formula was an absolute pleasure to work with, going on easily in two coats. It doesn't quite look nude against my skin, but it's still pretty and very appropriate for the conservative-office.


    I just may have to go back for the other nude from the Germany Collection, Don't Pretzel My Buttons. I'm more inclined to buy these "plain" colours, rather than the deep, metallic shades that are offered (though I love seeing them on other people's nails).

    Have you picked up any shades from the Germany Collection? What is your perfect nude colour? I am still on the hunt for mine!

    Monday, 20 August 2012

    Saran Wrap Nails with Border

    Happy Monday, friends! I decided to take a little break from the cartoon-y scenes and illustration manis I've been doing for the past couple weeks, and do something completely different. I've been wanting to try out saran wrap nails, as it seems easy to do, and easy to get really pretty results! Here's how my first attempt turned out:


    I wouldn't say they turned out exactly as I'd hoped, but I still think they look pretty, especially with a bit of glitter. I also added a border with a silver striping polish, and I quite like the outcome! I was always kind of on the fence about border nails - it can look awesome, but I feel it can be a bit harsh for me. The silver is subtle enough to overcome that concern.

    Polishes:
    Left to right: Sally Hansen "White On", "Sally Hansen "Green Tea", Sally Hansen "First Kiss", China Glaze "For Audrey", Wet n Wild "Kaleidoscope", Jordana "Star Designer"
    Materials:
    • saran wrap or a plastic sandwich bag
    Directions:
    1. Paint a white base onto your nails.
    2. Work on one nail at a time. Drop on spots of your colours, making sure most of your nail is covered.
    3. While the polish is wet, gently press the saran wrap or plastic bag against it. The colours will be marbled together.

    Easy right? I'll definitely try this again with different colours. Have you tried saran wrap nails yet? Do you like the border nails look?

    Thanks for reading!

    Friday, 27 July 2012

    Nail Art: Happy Clouds à la Nailside

    I had to cut my nails recently, and since I like keeping my nails at the same length, they all got cut down to nubs. I never know what to paint my nubs - there's so little room for nail art.

    Then I came upon Nailside's freehand cloud design, and it while it looks so lovely on longer nails, I thought it would also look super cute on short nails. So I had a go at it, and I adore the result! I just might have to do this every time I have nubs for nails.


    Polishes:
    Left to right: Loreal "Mango-Get-Em", Nature Republic colour PP402, Kleancolor "Mango"


    Check out Nailside's wonderful cloud tutorial here

    Looking forward to wearing this happy design for the weekend! Have a good one!