Monday, 30 July 2012

Nail Art: Cookies & Milk with Nails Inc Sugar House Lane

I have some sweet nail art for you today, with Sugar House Lane from the Nails Inc Sprinkles collection. I went to stalk my local Sephora the week after this collection came out, and was surprised they still didn't have it out on display. After a couple more times of disappointment, I finally asked one of the girls working there, and turns out the display was up near the checkout counter all along. Oops.

Anywho, I pick up two of my favourites, and Sugar House Lane was one of them. I was sold on the milky base and black glitter - reminded me so much of cookies and cream.


Sugar House Lane is a light taupe base with matte black and silver glitter. Because of the milky base, the silver glitter looks white. The glitter lays flat and smooth on the nail. I only needed one coat for great colour and glitter coverage.

Polishes:
Left to right: Nails Inc "Sugar House Lane", Nubar "Swiss Chocolate", Sally Hansen "Black Out", Sally Hansen "White On"
 Materials:
  • bobby pin
  • nail art brush
  • toothpick
  • nail art pen
Directions:
Base: Paint your nails with Sugar House Lane

Cookies:
1) Paint a circle with a bobby pin (or dotting tool if you have one).
2) Use nail art brush to paint a small half-circle on the edge of the first circle you drew.
3) Repeat step 2) all the way around your large circle.
4) Add white dots with a toothpick. Use the points between your half-circles to get the dots evenly spaced.

Milk:
1) Use a nail art brush to paint a flat oval for the lip of the milk bottle.
2) Paint the bottle body with your brush.
3) Paint the form of the bottle lip with thin round strokes, and the milk line with an oval.
4) Outline the rest of the bottle and add the word MILK with either a nail art pen or brush.

Finished!


Doesn't this make you want to eat an Oreo? Does this polish look as appetizing to you as it does to me?

Friday, 27 July 2012

Nail Art: Happy Clouds à la Nailside

I had to cut my nails recently, and since I like keeping my nails at the same length, they all got cut down to nubs. I never know what to paint my nubs - there's so little room for nail art.

Then I came upon Nailside's freehand cloud design, and it while it looks so lovely on longer nails, I thought it would also look super cute on short nails. So I had a go at it, and I adore the result! I just might have to do this every time I have nubs for nails.


Polishes:
Left to right: Loreal "Mango-Get-Em", Nature Republic colour PP402, Kleancolor "Mango"


Check out Nailside's wonderful cloud tutorial here

Looking forward to wearing this happy design for the weekend! Have a good one!

Wednesday, 25 July 2012

American Apparel Sheer Nail Polish: Swatches & Review

Today I have for you American Apparel's line of sheer nail polish. I've always been a huge fan of their polishes. They have great colours with amazing pigmentation, perfect for nail art! So when I heard they were coming out with a line of sheer polishes, I was intrigued, and when I saw the promo pictures, I was absolutely smitten.

They were so beautiful, I had to get them all.
The formula was thin and flowed easily onto the nail, and this was consistent across the line. While sheer, the pigmentation is spot on, and you can get great coverage in three coats (though you can still see your nail line). Drying time was very quick, and they all dry to a beautiful, glossy finish.

In the swatches below, I show each colour in one, two, and three coats to show you how they build up. There's a lot to show, so let's get to it:


Left to right: one, two , three coats
indoor
natural light
  Summerland Beach is a peachy rose pink.

Left to right: one, two, three coats
indoor
natural light
Manhattan Beach is a very pretty coral.

Left to right: one, two three coats
indoor
natural light
Redondo Beach is a bright, sky blue. It was a tiny bit streaky on the first coat, but evens out. This one might be my favourite in terms of layering possibilities, if not just for colour.


Left to right: one, two, three coats
indoor
natural light
Moonlight Beach is a navy blue with a strong hint of purple.

Left to right: one, two, three coats
indoor
natural light
Pacific Beach is a bright turquoise. There is definitely more green than blue in most lighting. Ok, this may be my favourite in terms of colour.

Left to right: one, two three coats
indoor
natural light
Zuma Beach is a chartreuse green that looks bright, but kind of muted at the same time. 

Of course, I had to recreate the gradient effect that I fell in love with in the promo pics. I painted three coats of each base colour, then made the gradient by sponging another colour onto the tips. Here are the combinations I used:

Thumb: Summerland Beach as base, Redondo Beach sponged on
Index: Redondo Beach as base, Manhattan Beach sponged on
Middle: Pacific Beach as base, Moonlight Beach sponged on
Ring: Manhattan Beach as base, Moonlight Beach sponged on
Pinky: Zuma Beach as base, Redondo Beach sponged on


Overall, I absolutely adored this sheer line! The colours are vibrant and go so beautifully together. I can't to try other gradient combinations, and layering experiments. Jelly sandwiches, layering colours over each other, layering over creme polishes...oh the possibilities!

What are your favourites and will you be picking any up to try out the gradient look? 

Monday, 23 July 2012

Essie Mirror Metallics: Blue Rhapsody and Penny Talk Swatches & Review (with a little nail art)

I used to think metallic finishes were totally not my thing (hence the lack of them in my collection), but when I saw the promo pics for the Essie: Mirror Metallics Collection, I thought,  well, maybe they can be my thing after all.

Went out to my local Trade Secrets and picked up two of my favourites from the collection. Blue Rhapsody and Penny Talk.

The thing with metallics is, they show every bump and ridge on your nail. Either use a ridge filling base coat, or just skip it altogether if you already have smooth nails. The formula can be a little tricky to work. It's smooth, but also drags quite easily, so keep brushstrokes to a minimum. The colours themselves are amazingly reflective, and it is just like having brushed metal on your nails. Full opacity in just one coat, and I recommend to keep it at one, since the more coats, the easier for bumps to show.     

 Blue Rhapsody is a silvery, light metallic blue. Very cool colour.

Penny Talk a coppery rose gold. It has the perfect mix of both pink and gold that I think would be universally flattering on any skin tone.

I love it with some black Chevron tips to break up some of the shininess.

Saturday, 21 July 2012

Nail Art: The Dark Knight Rises

The Dark Knight Rises was one of the summer blockbusters that I was most looking forward to (right up there with The Avengers), so of course I had to do a little nail art to celebrate its release!

The Bat Signal, Batman, and Catwoman with black and yellow Chevron tips

After working on my left hand, my right hand usually gets neglected

Polishes:
Left to right: Sally Hansen "Celeb City", Sally Hansen "Mellow Yellow", Sally Hansen "White On", Sally Hansen "Black Out", Nubar "Swiss Chocolate", Folk Art acrylic paint in #949 "Skintone"

Materials:
  • bobby pin
  • nail art brush
Directions:

Base: Paint your thumb black, and the rest silver


Batman and Catwoman: both painted using a nail art brush, with a bobby pin to dot on the eyes. I used acrylic paint for the skin mainly because it's easier than having to mix my own skintone every time. Yay for the easy way.

Chevron Tip: I used two thick-ish coats for the yellow to show. When making the Chevron pattern, it's easiest to make long, diagonal strokes from side to tip.

Bat Signal: Use a white base to help the yellow show up easier against the black base. The best way to paint the bat is to break it down into chunks. If you make any mistakes, you can go back and use yellow polish to fix or refine it.

I can't wait to watch the movie!! Anybody else excited for it? Seen it already?

Thursday, 19 July 2012

Nail Art: Android Love

No matter what kind of phone you use, you gotta admit, those little Google androids are so cute! Show some android love with this design.


Polishes:
 
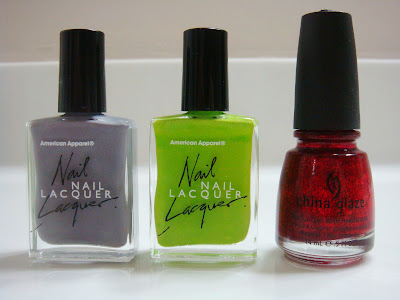
Left to right: American Apparel "Factory Gray", American Apparel "Crescent Heights", China Glaze "Ruby Pumps"


Materials:
  • bobby pin
  • toothpick
  • nail art brush (any small paint brush would do - I use an old one I had lying around from art class)
 Directions:
Base: Paint your nails gray
 
Android:
1) Use a bobby pin to draw a semi-circle
2) Draw on the antennas with a toothpick
3) Use a bobby pin to make two small dots at the end of the antennas
4) Use a white polish and dot on eyes

Heart:
1) Dot two circles beside each other with a bobby pin
2) Use a nail art brush (you can use a toothpick as well, but I find the brush easier) to connect the two circles
3) Fill in the heart

Bow:
1) Use a nail art brush to draw two triangles
2) Depending how you like your bow to look, dot on a small circle where the triangles meet

Finished!


I did a small variation using the same elements on my right hand. Have fun with it!

Wednesday, 18 July 2012

How To: Create a Perfect Gradient with a Makeup Sponge

Gradients have quickly become my favourite nail trend (as you will see in my future posts). For such a cool looking effect, they are so easy to do! It also gives me the chance to use multiple colours, so I feel way justified for having so many polishes.

There are mainly two ways I use to create a gradient: brushing and layering on sheer polish, or stamping with a makeup sponge. Using a makeup sponge is my favourite way as it gives a smooth transition between colours.

General Tips for a Sponge Gradient

  • choose pigmented, opaque colours
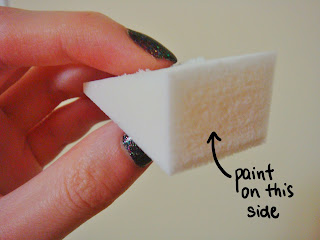
  • paint a generous amount of polish on the sponge, since the sponge absorbs it
  • don't be afraid to go over the gradient again if the colours are not opaque enough, or you missed some spots (but give the first layer some time to dry first)
  • dab sparingly while blending the colours - the sponge already does most of the work, and you don't want to lift the paint off by dabbing too much
  • you can use the same side of the sponge, as long as it's not overly saturated with polish, and the polish is not dry yet - I usually use one side for one hand, then switch to a fresh clean side for the other
  • finish one hand and clean up with Q-tips (cotton swabs) around the nail before doing the other - it's easier to clean before the polish is completely dry

My colour choices for gradients don't always work out, but this one came out wonderfully. I wore this on vacation to San Diego and received many compliments for it!


Polishes:
Left to right: American Apparel "Malibu Green", OPI "No Room for the Blues", Sally Hansen "Blue Away", OPI "Last Friday Night"

Materials:
A makeup sponge
Directions:
1) Paint stripes of your colours on the makeup sponge in the order you want them to show up on your nail.
This is how we do it at The Nail Artiste - hand-drawn pictures
2) Stamp the stripes onto the nail and dab, moving up and down along the nail until the colours are blended
3) Repeat steps 1)-2) with other nails. Go over again any nails that are not opaque enough or have bald spots
4) Optional: add some sparkle. Here I brushed OPI "Last Friday Night" on two-thirds of my nail
5) Clean up with Q-tips and nail polish remover
6) Top coat over everything
You're going to need a bit of cleanup


Finished!


 Have fun experimenting with different colours and combinations! I think I'll be doing gradients for a while to come...

Tuesday, 17 July 2012

Nail Art: Totoro with American Apparel "Factory Gray"

Hello everyone!

I'm very excited to start this blog dedicated to my two great loves: art and nail polish. While I'm simply a hobbyist in the art world, I've always loved drawing and making little crafts as a form of creation and self-expression. My love affair with nail polish began about four years ago, and my collection went from a couple pale pinks, to every colour (in multiple shades) of the rainbow. Nail art was a natural progression and became the perfect way to bring the two together!

I'll be posting written and photo tutorials on my designs. I hope they'll be simple and easy to follow, but if you have any questions, please don't hesitate to ask!

I will also be doing nail polish reviews. For me, I like to do research before buying most nail polishes, so I hope I can be of some help to you here.

Alright, FINALLY, let's get started! Today, let's paint Totoro from Hayao Miyazaki's beloved movie "My Neighbour Totoro." I couldn't tell you how many times I've watched this movie as a kid, so I certainly enjoyed having a cute little Totoro on my nails.


Polishes:
Left to right: American Apparel "Factory Gray", Sally Hansen "White On", Sally Hansen "Black Out"

Materials:
A bobby pin, toothpick, Sally Hansen black nail art pen

Directions:

Base: Paint all your nails gray.

Totoro: put him on your accent nail
1) About halfway up your nail, paint a white square, leaving a bit of room on either side, for Totoro's belly
2) Use the round end of a bobby pin to dot on two white circles for eyes
3) Either dip a toothpick into black polish, or use a nail art pen for the black details (eyes, nose, whiskers)
4) Use a toothpick to make inverted V shapes on Totoro's belly (I did mine the wrong way - oops)

Soot Sprites: create as many of these as you want!
1) Use a bobby pin to create black dots of different sizes - the soot sprites look kind of fuzzy, so don't worry about neatness here!  
2) Do their eyes the same way you did Totoro's!

Finished!


I hope you enjoyed my first nail art tutorial! I'd love to hear comments and see your own nail art pictures!